Showing posts with label cake. Show all posts

Wednesday, 17 May 2017

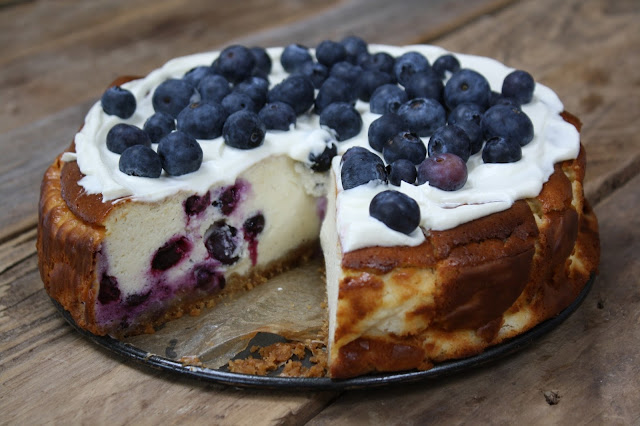
Baked Blueberry and Vanilla Cheesecake


I like to have one or two definitive recipes for each seasonal fruit. Ones that I know will always work and when the season for that fruit comes around again I get excited and start salivating about making again. But up until now, I have never had one such recipe for blueberries. So, I set about rectifying the situation and the first thing that sprang to mind was Blueberry Cheesecake.

I am always a little apprehensive about making cheesecake. I think I have just had so many horrid ones, over sweet, gelatinous and gloopy! When I was a kid in the 70’s I even remember making one from a packet which was pretty disgusting. But then I went to New York and I will never forget the wondrous baked cheesecakes, topped with sour cream. Slightly grainy at the edges, totally wobbling creaminess in the middle. Mind-blowing. So, I was a little nervous of trying to recreate what I had reminisced. I scoured through hundreds of recipes to find one that sounded right, and never imagined that the first one I tried was going to turn out such perfection.


Baked Blueberry and Vanilla Cheesecake
150g digestive biscuits, smashed
20g caster sugar
70g butter, melted

Filling
800g Philadelphia cream cheese
150g creme fraiche
175g caster sugar
1 tablespoon vanilla bean paste, or essence
4 eggs
30g flour
50ml milk
200g blueberries
100g creme fraiche
200g blueberries to decorate

Preheat oven to 170 C / Gas mark 4. Lightly oil a 25cm cake tin. I lined mine with grease-proof as I was frightened that otherwise it would leak.

Mix the biscuits, sugar and butter together and press evenly into the bottom of the tin to form a base. I used a potato masher.
   
Mix the creme fraiche, cream cheese, sugar and vanilla using an electric mixer. Add the eggs one after another and always mix well in between. Add the milk and flour and mix as well. Stir in the blueberries and pour into the tin. Bake for about 1 hour in the oven. The cake should be well risen, golden brown on top and just very slightly wobbly in the middle. Take out and allow to cool. After cooling spread the cake with 100g of creme fraiche and let it cool in the fridge for at least 3 hours. I couldn’t wait and ate mine after about an hour. Decorate with blueberries.

Monday, 19 September 2016

Apple and cinnamon crumble cake


It is apple season and I am overwhelmed with apples at the moment after inheriting a huge tree in my new garden. It left me craving apple cake but I have to admit that I did not have a famous, family recipe handed down for generations. I was determined it should be perfect. So, where to start?  No cookbooks of mine sprang to mind, so I scoured the internet and as I have found before, this is a dangerous pastime. There are literally thousands of recipes to choose from and no real guarantee that any of them are any good or even going to work. In the past I have stuck to safe bets such as Jamie Oliver, BBC Good Food or allrecipes.co.uk. Large corporations, such as Jamie Oliver have testing kitchens which try out all the recipes, so they tend to be more likely to work. Other websites such as allrecipes have ratings so you can try and get an idea on the feedback. So after sifting through at least half a dozen recipes I decided on one by Nigella Lawson which had been tested and had good ratings. I am very disappointed to say it really was not very good. More of a pudding than a cake, it just was not special at all. I was quite irritated to say the least. I had made it and photographed it for this blog, which had taken quite some time and now I was at a bit of a quandary as to whether I should just write it up anyway, and say it was OK or start again. 
The cake sat there uneaten. It was the kind of cake which was just not worth sacrificing your waistline for. I wanted a cake that made you say “to hell with the calories, this is too good.” I decided I just had to try harder. Back to the drawing board.  I thought about what I really wanted from an apple cake. Apply, crumbly, not too sweet and a hint of Cinnamon. I wanted a cake that it didn’t matter exactly how many apples you used or what type of apple they were, it would still deliver on texture and taste. I finally found a recipe and I am proud to say that it is nothing short of perfect. Irresistibly good and every bit worth the calories.

Apple and cinnamon crumble cake
For the crumble topping:
125g plain flour
2 tsp ground cinnamon (depending on how much you like cinnamon)
50g slightly salted butter, cold, cubed
125g demerara or light brown sugar
50g roasted chopped hazelnuts or almonds
For the cake:
250g plain flour
2 tsp baking powder
125g slightly salted butter, softened
150g golden caster sugar
1 tsp vanilla bean paste
100ml milk
2 large organic free range Eggs
6 Cox or Braiburn apples or 4 Bramleys
Juice 1 lemon
1. Preheat the oven to 180°C, gas mark 4. Grease and line a 22cm round cake tin with baking parchment. For the crumble topping, place the flour, cinnamon and cold butter into a large bowl or and rub together with your fingertips until the mixture resembles breadcrumbs. Stir in the sugar and nuts then transfer to the fridge. (Alternatively put the whole lot in a food processor and pulse until you have breadcrumbs)
2. For the cake, sift the flour and baking powder into a bowl and set aside. Using a mixer or electric handheld whisk, cream the butter, sugar and vanilla until pale and fluffy. In a separate bowl, whisk together the milk and eggs. Gradually beat a little flour into the butter mixture, followed by a little of the milk and eggs, alternating until they’re all mixed in. Spoon the cake mixture into the prepared tin and level with the back of a spoon. (This can all be done in a food processor too.)
3. Peel, core and halve the apples, then slice thinly and toss in the lemon juice. Arrange on top of the cake mixture then sprinkle the chilled crumble over the top.
4. Bake for 1 hour or until a skewer inserted into the centre of the cake comes out clean. You can see when it is done as the cake rises in the middle and the apples begin to poke out. Transfer to a wire rack to cool. Great with vanilla ice-cream, whipped cream or clotted cream.

Thursday, 11 February 2016

Just What the Doctor Ordered!


Not feeling at all well this week. I had a serious bronchial, chesty cough and felt really under the weather. All of my great new year resolutions about healthy eating have gone out the window. I need energy fast and that means chocolate. I am a strong believer that we crave what we need, so I simply must be deficient in chocolate. I even found this article on Net Doctor, although it may be a bit far fetched.

“A study published in the Federation of American Societies for Experimental Biology Journal has shown that eating chocolate could have a positive effect in reducing cough symptoms. The study showed that an ingredient in chocolate, called theobromine, was more effective at stopping persistent coughs than common cough treatments. There’s one study that’s shown some links. But the benefit may well only be due to the sweetness of the chocolate rather than anything else,’ says Professor Eccles. This stimulates salivation and mucus secretion that helps relieve cough symptoms.'”

Rather than eat large mouthfuls of the cooking chocolate straight out of the fridge, I decided to make a chocolate brownie, and so as not to give up on all my good resolutions quite yet, I decided to add some healthy beetroot from my veg box.

Beetroot

There is absolutely no doubt, beetroot is super good for you –

1. Lower Your Blood Pressure
Drinking beet juice may help to lower blood pressure in a matter of hours. One study found that drinking one glass of beet juice lowered systolic blood pressure by an average of 4-5 points. The benefit likely comes from the naturally occurring nitrates in beets, which are converted into nitric oxide in your body. Nitric oxide, in turn, helps to relax and dilate your blood vessels, improving blood flow and lowering blood pressure.

2. Boost Your Stamina
If you need a boost to make it through your next workout, beet juice may again prove valuable. Those who drank beet juice prior to exercise were able to exercise for up to 16 percent longer. The benefit is thought to also be related to nitrates turning into nitric oxide, which may reduce the oxygen cost of low-intensity exercise as well as enhance tolerance to high-intensity exercise.

3. Fight Inflammation
Beets are a unique source of betaine, a nutrient that helps protects cells, proteins, and enzymes from environmental stress. It’s also known to help fight inflammation, protect internal organs, improve vascular risk factors, enhance performance, and likely help prevent numerous chronic diseases.

4. Anti-Cancer Properties
The powerful phytonutrients that give beets their deep crimson colour may help to ward off cancer. Research has shown that beetroot extract reduced multi-organ tumour formations in various animal models when administered in drinking water, for instance, while beetroot extract is also being studied for use in treating human pancreatic, breast, and prostate cancers.

5. Rich in Valuable Nutrients and Fibre
Beets are high in immune-boosting vitamin C, fibre, and essential minerals like potassium (essential for healthy nerve and muscle function) and manganese (which is good for your bones, liver, kidneys, and pancreas). Beets also contain the B vitamin folate, which helps reduce the risk of birth defects.

6. Detoxification Support
The betalin pigments in beets support your body’s Phase 2 detoxification process, which is when broken down toxins are bound to other molecules so they can be excreted from your body. Traditionally, beets are valued for their support in detoxification and helping to purify your blood and your liver.


So as you see, it is just what the doctor ordered!

Beetroot and Chocolate Brownie (Gluten Free) 1

Chocolate and Beetroot Brownie This is particularly delicious with a dollop of clotted cream. Riverford do a very good one.
 
250g dark chocolate, chopped
200g unsalted butter, cut into cubes
350g beetroot, about 2 medium sized
3 eggs
vanilla extract
200g golden caster sugar
50g cocoa powder,
50g rice flour (ground rice)
1 teaspoon baking powder
100g ground almonds


Preheat the oven to 180C. Wrap the beetroot in tin foil and put in the oven for about 45 minutes. They are cooked when a skewer inserts and removes very easily. Remove the tin foil and allow to cool for 10 minutes or so. Slip the skins off, whilst still warm. (Wear surgical gloves if you have some.) Meanwhile put the chocolate and butter in a large bowl and place it over a pan of simmering water, making sure the water doesn’t touch the base of the bowl. Leave to melt. Alternatively, heat in the microwave for 2 minutes.
Purée the cooked beetroot in a food processor. Add the eggs one at a time, followed by the vanilla and sugar, and mix until smooth. Add the cocoa powder, rice flour, baking powder and ground almonds. Whiz up and then mix in the melted chocolate and butter.
Turn the oven down to 170C. Butter and then line with baking parchment a preferably rectangular tin, roughly 28 x 18cm. (I used a round one.) Pour in the mixture and place in the and bake for 30–35 minutes, until just firm to the touch. It’s important not to overcook brownies; a skewer inserted in the centre should come out only just clean. Leave to cool in the tin and then cut into squares.

Beetroot and Chocolate Brownie (Gluten Free) 3


Monday, 6 February 2012

Pretty in Pink


I am not a great romantic and Valentines day is the most abhorrent day of all to me.  It makes me cringe, just thinking about it. It smacks of everything I dislike. An exploited, commercial opportunity which seems to focus on making as much money as possible out of peoples complete lack of imagination and originality.   Why on earth would I want a bunch of dodgy overpriced, cheap Dutch roses or worse still, a nasty box of chocolates.  Worse still, is the thought of going out to dinner on Valentines day.  Massively over-inflated prices, in packed restaurants, desperately trying to get rid of you so they can turn your table.  In my last restaurant, The Vale, the bookings would start flooding in as early as the first week of January and we would be booked to bursting before February began, with a waiting list as long as my arm.  The whole dining room would have to be completely recreated to accommodate endless tables of two, who would whisper all night and gaze at each other adoringly.  Please don't get me wrong.  I am not bitter.  I am very happily settled with my Hughie.  We try to love each other every day, all year.  O.K. -" try to" may be the operative word but at least it is not on one allotted day a year, in a forced show of over-sentimental emotion.  


What does fill me with passion about February however is the first of the forced Rhubarb. I love it with its mouth-watering sourness, which when balanced with something sweet is just sensational. I also adore it's beautiful, deep and luscious colour. So as soon as I saw it for sale, I just had to have some and I had my heart set on a cake but what sort to choose?  I am bit particular about my flavour pairings with my rhubarb.  Whilst many lean towards orange and ginger, I feel that they are too distracting in flavour and I will only match vanilla or almonds with mine.  Secondly, I was determined that this cake should fully exploit the rhubarbs beautiful colour.  Thirdly I am particularly fond of the sort of cakes that you can serve as a pudding, with a big dollop of clotted cream or a jug of custard.  Eventually I amalgamated about five different recipes together and came up with this Upside-down Rhubarb, Almond and Vanilla Cake and I have to say, I was pretty enamoured with the result.  The rhubarb gently stews in it's own juices and ever so slightly begins to caramelise.  Quite delicious!

In fact, I was so infatuated with it, I entered it for Tea Time Treats over at What Kate Baked. Well it is pink!


Rhubarb, Almond and Vanilla Upside-down Cake

400g pink rhubarb
150g golden caster sugar
130g dark Muscovado Sugar
150g unsalted butter,softened
3 large eggs, beaten
110g  self-raising flour
110g ground almonds
135g (1/2 cup)  sour cream

1 tsp of Vanilla Bean Paste
pinch salt
Spring-form cake tin with a diameter of 24cm and a depth of 6cm, greased, sides and base lined with one piece of baking parchment

Serves: 8
Cut  the rhubarb into 1cm slices and toss them, in a bowl, with the caster sugar.
Tip into your tin and scatter evenly.

Preheat the oven to 170C, 325F, gas mark 3.
Cream together the butter and Muscovado sugar until light and fluffy. Gradually beat in the eggs.  Don't worry if it curdles.  Fold in the flour, almonds, vanilla and sour cream. Spoon the mixture into the prepared tin and smooth on top of the rhubarb, making sure it is evenly covered.  Bake in the oven for about 3/4 hour or until the cake is firm to a light touch in the centre. Cool in the tin for 15 minutes before loosening around the edges with a knife and turning out either onto a serving plate or a wire rack to finish cooling.
This is good served with some custard, clotted cream or vanilla ice cream.

Sunday, 13 November 2011

Cupcake Challenge


I am addicted.  I can't seem to stop entering blogging challenges.  My latest is Ruth al-Mushadani's "Cupcake Challenge".  This is the third cake challenge I have entered this month and I don't even make cakes.  But something about the suggested ingredients this month of marshmallows, walnuts, cinder toffee, tea, orange and maple syrup grabbed me. I kind of wanted to eat all of them at the same time but the challenge of just picking two or three was also strangely compelling.  

The first thought that inspired me was tea flavoured cup cakes.  I love both Lapsang Souchong and Earl Gray Tea.  Lapsang has a wonderful smoky flavour like drinking a bonfire whilst Earl Grey is a fragrant, heady mixture of citrus and floral aromas like sticking your face in an old fashioned rose.  I tried using them in the cup cake mix but the flavour just did not come through, no matter how strong I made the tea.

The next thing that jumped out from the list, was walnuts and maple syrup which is just a classic combination made in heaven.  It just makes me think of autumn walks, kicking up the leaves and heading home before it gets dark at 4pm.  So here I am again, baking cakes.  Thanks Cupcake Challenge!


Cupcakes with Maple Glazed Walnuts
125g unsalted butter at room temperature
125g caster sugar
2 eggs at room temperature
125g self raising flour
1/2 tsp baking powder
1 batch of Maple Glazed Walnuts
Preheat the oven to 170C and line the muffin tin with paper cups for the cupcakes.
Add butter and caster sugar to a bowl and cream until pale. Add eggs, one by one and mix until   emulgamated.  Fold in the flour, ground Maple Glazed Walnuts and baking powder. If the mixture is a little thick add a little Maple Syrup.  You should have a soft, dropping consistancy. Divide the batch evenly into the muffin cups. I do this with a disposable piping bag. Place in oven for 15 - 20 minutes, until golden brown and bounce back when pressed. Let cool before frosting
Frosting:
125g unsalted butter at room temperature
250g icing sugar, sifted
3 tbsp Maple Syrup (buy the thickest, although less refined, it has more flavour.)
Cream the butter and maple syrup together with a mixer until light and fluffy.  Add the icing sugar and mix well.  Pipe or spread on the cooled cupcakes and decorate wtih the Maple Glazed Walnuts.


Maple Glazed Walnuts
2 cups walnut halves
1/3 cup maple syrup 
(buy the thickest, although less refined, it has more flavour.)
1/8 teaspoon salt

Preheat a dry skillet over a medium-high heat. Add the walnuts, maple syrup and salt. Cook, stirring frequently, until syrup is caramelized and nuts are toasted, about 5 minutes. Let cool spread out on greeseproof paper.  Pick out the 12 best to decorate and grind the rest in a food processor.


Monday, 31 October 2011

Halloween Hell


Halloween!  What a perfect time for kids.  What a super time to spend time together as a family. How many Halloween magazine spreads do I have to bear - happy children, beautiful spotless house, everyone smiling, carving pumpkins, baking cakes, dressing-up, happy, happy, happy......Looks so lovely and if it wasn't for one thing, it really would be quite easy to achieve the fantasy. What is the obstacle that once again so cruelly prevents me from finally achieving that perfect family moment?  The bloody kids!  

Instead, an hours happy recreation is turned into a stress filled two hours, with another hour just to clear up. "Please get you fingers out of the cakes", "Don't eat any more icing, you will be sick",  "Of course I love you helping me, but you can't use that very sharp knife","I told you not to eat anymore icing", "You can't lick the spoon and use it again",  "I have absolutely had enough.  Just go and play somewhere else!"  Slimy pumpkin seeds litter the floor, sticky icing on every possible surface.  Happy, happy, happy.........

I have to admit that I never used to make many cakes.  Once I started cooking in restaurants there was never much call for them as they were not considered a classic dessert.  An exception was the Chocolate Nemesis at the River Cafe which I made so often that I can still remember the recipe off by heart even today.  It was so mousse-like in texture that I suppose it wasn't really a cake at all  and passed as a pudding.  

Now a days, two kids later and what with birthdays, mum's coffee mornings and endless school charity cake sales, I seem to be endlessly making cakes and my skills are coming along.  I am not going to pretend that I am anyway as talented as all those cupcake bloggers out there who spend their lives in pursuit of the perfect cupcake and my heart will still always be with the savoury but this week was my son, Daniel's seventh birthday birthday.  I must admit that I only intended to make the cup-cakes and buy the cake but when I got to the supermarket they had sold out of Halloween cakes, four days before Halloween itself.  So I ended up making that as well.  

I chose a super chocolate cake recipe which is really easy and fantastically rich and fudge-like in consistency.  In contrast I wanted the cup cakes to be as light as possible.  The vanilla cupcake recipe is from The Hummingbird Bakery and somehow manages to be airy but chewy at the same time, which I find quite satisfying.  The chocolate Nutella cupcakes I got from The Ordinary Cook.  I have made them before and they are a winner.  Just sublime.  Once I got the kids out the way it was plain sailing.


Amazing Chocolate Cake
200g good quality dark chocolate, about 60% cocoa solids
200g butter , cut in pieces
1 tbsp. instant coffee granules
85g self-raising flour
85g plain flour
1⁄4 tsp bicarbonate of soda
200g light muscovado sugar
200g golden caster sugar
25g cocoa powder
3 medium eggs
75ml buttermilk (5 tbsp)
grated chocolate or curls, to decorate

Chocolate Ganache
200g good-quality dark chocolate , as above
284ml carton double cream (pouring type)
2 tbsp golden caster sugar


Butter a 20cm round cake tin (7.5cm deep) and line the base. Preheat the oven to fan 140C/conventional 160C/ gas 3. Break the chocolate in pieces into a medium, heavy-based pan. Tip in the butter, then mix the coffee granules into 125ml/4fl oz cold water and pour into the pan. Warm through over a low heat just until everything is melted - don't overheat. Or melt in the microwave on Medium for about 5 minutes, stirring half way through.
While the chocolate is melting, mix the two flours, bicarbonate of soda, sugars and cocoa in a big bowl, mixing with your hands to get rid of any lumps. Beat the eggs in a bowl and stir in the buttermilk.


Now pour the melted chocolate mixture and the egg mixture into the flour mixture, stirring just until everything is well blended and you have a smooth, quite runny consistency. Pour this into the tin and bake for 1 hour 25- 1 hour 30 minutes - if you push a skewer in the centre it should come out clean and the top should feel firm (don't worry if it cracks a bit). Leave to cool in the tin (don't worry if it dips slightly), then turn out onto a wire rack to cool completely.


When the cake is cold, cut it horizontally into three. Make the ganache: chop the chocolate into small pieces and tip into a bowl. Pour the cream into a pan, add the sugar, and heat until it is about to boil. Take off the heat and pour it over the chocolate. Stir until the chocolate has melted and the mixture is smooth.


Sandwich the layers together with just a little of the ganache. Pour the rest over the cake letting it fall down the sides and smoothing to cover with a palette knife. Decorate with grated chocolate or a pile of chocolate curls or ghosts. The cake keeps moist and gooey for 3-4 days.


Vanilla Cupcakes
120g plain flour
140g caster sugar
1 ½ tsp baking powder
a pinch of salt
40g unsalted butter, at room temperature
120ml whole milk
1 egg
¼tsp vanilla extract
1 quantity vanilla frosting
a 12-hole cupcake tray, lined with paper cases
Vanilla frosting:
250g icing sugar, sifted
80g unsalted butter, at room temperature
25ml whole milk
a couple of drops of vanilla extract


Nutella Filled Chocolate Cupcakes
Makes 10
110g light soft brown sugar
110g softened butter
120g self raising flour (or plain flour with 1 tsp baking powder added)
20g good quality cocoa
2 eggs
Nutella or hazelnut chocolate spread, about 6 teaspoons.  Place all of the ingredients, except for the Nutella, in a large bowl and whisk well until all is combined.  Place a scant teaspoonful of the mixture into a fairy cake (mini muffin) case in a patty (mini muffin) tin. Place half a teaspoonful of Nutella on top. Cover with another scant teaspoonful of cake batter. Repeat with the remaining eleven. Place in a preheated oven at 180°c, gas mark 4 or the baking oven of the Aga for 15-20 minutes until springy to the touch of a light finger.  Place on a wire rack to cool.