Showing posts with label Kids. Show all posts

Wednesday, 17 May 2017

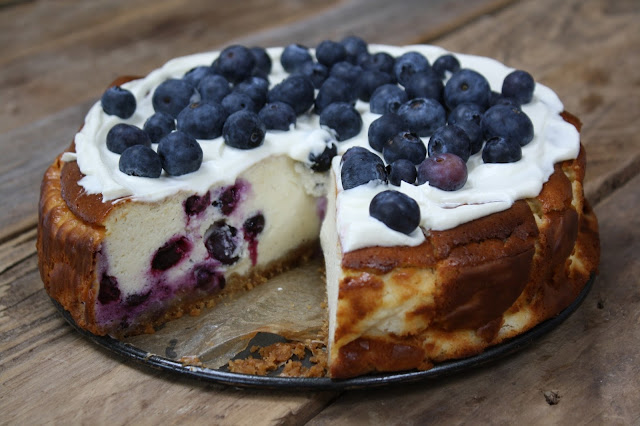
Baked Blueberry and Vanilla Cheesecake


I like to have one or two definitive recipes for each seasonal fruit. Ones that I know will always work and when the season for that fruit comes around again I get excited and start salivating about making again. But up until now, I have never had one such recipe for blueberries. So, I set about rectifying the situation and the first thing that sprang to mind was Blueberry Cheesecake.

I am always a little apprehensive about making cheesecake. I think I have just had so many horrid ones, over sweet, gelatinous and gloopy! When I was a kid in the 70’s I even remember making one from a packet which was pretty disgusting. But then I went to New York and I will never forget the wondrous baked cheesecakes, topped with sour cream. Slightly grainy at the edges, totally wobbling creaminess in the middle. Mind-blowing. So, I was a little nervous of trying to recreate what I had reminisced. I scoured through hundreds of recipes to find one that sounded right, and never imagined that the first one I tried was going to turn out such perfection.


Baked Blueberry and Vanilla Cheesecake
150g digestive biscuits, smashed
20g caster sugar
70g butter, melted

Filling
800g Philadelphia cream cheese
150g creme fraiche
175g caster sugar
1 tablespoon vanilla bean paste, or essence
4 eggs
30g flour
50ml milk
200g blueberries
100g creme fraiche
200g blueberries to decorate

Preheat oven to 170 C / Gas mark 4. Lightly oil a 25cm cake tin. I lined mine with grease-proof as I was frightened that otherwise it would leak.

Mix the biscuits, sugar and butter together and press evenly into the bottom of the tin to form a base. I used a potato masher.
   
Mix the creme fraiche, cream cheese, sugar and vanilla using an electric mixer. Add the eggs one after another and always mix well in between. Add the milk and flour and mix as well. Stir in the blueberries and pour into the tin. Bake for about 1 hour in the oven. The cake should be well risen, golden brown on top and just very slightly wobbly in the middle. Take out and allow to cool. After cooling spread the cake with 100g of creme fraiche and let it cool in the fridge for at least 3 hours. I couldn’t wait and ate mine after about an hour. Decorate with blueberries.

Monday, 19 September 2016

Apple and cinnamon crumble cake


It is apple season and I am overwhelmed with apples at the moment after inheriting a huge tree in my new garden. It left me craving apple cake but I have to admit that I did not have a famous, family recipe handed down for generations. I was determined it should be perfect. So, where to start?  No cookbooks of mine sprang to mind, so I scoured the internet and as I have found before, this is a dangerous pastime. There are literally thousands of recipes to choose from and no real guarantee that any of them are any good or even going to work. In the past I have stuck to safe bets such as Jamie Oliver, BBC Good Food or allrecipes.co.uk. Large corporations, such as Jamie Oliver have testing kitchens which try out all the recipes, so they tend to be more likely to work. Other websites such as allrecipes have ratings so you can try and get an idea on the feedback. So after sifting through at least half a dozen recipes I decided on one by Nigella Lawson which had been tested and had good ratings. I am very disappointed to say it really was not very good. More of a pudding than a cake, it just was not special at all. I was quite irritated to say the least. I had made it and photographed it for this blog, which had taken quite some time and now I was at a bit of a quandary as to whether I should just write it up anyway, and say it was OK or start again. 
The cake sat there uneaten. It was the kind of cake which was just not worth sacrificing your waistline for. I wanted a cake that made you say “to hell with the calories, this is too good.” I decided I just had to try harder. Back to the drawing board.  I thought about what I really wanted from an apple cake. Apply, crumbly, not too sweet and a hint of Cinnamon. I wanted a cake that it didn’t matter exactly how many apples you used or what type of apple they were, it would still deliver on texture and taste. I finally found a recipe and I am proud to say that it is nothing short of perfect. Irresistibly good and every bit worth the calories.

Apple and cinnamon crumble cake
For the crumble topping:
125g plain flour
2 tsp ground cinnamon (depending on how much you like cinnamon)
50g slightly salted butter, cold, cubed
125g demerara or light brown sugar
50g roasted chopped hazelnuts or almonds
For the cake:
250g plain flour
2 tsp baking powder
125g slightly salted butter, softened
150g golden caster sugar
1 tsp vanilla bean paste
100ml milk
2 large organic free range Eggs
6 Cox or Braiburn apples or 4 Bramleys
Juice 1 lemon
1. Preheat the oven to 180°C, gas mark 4. Grease and line a 22cm round cake tin with baking parchment. For the crumble topping, place the flour, cinnamon and cold butter into a large bowl or and rub together with your fingertips until the mixture resembles breadcrumbs. Stir in the sugar and nuts then transfer to the fridge. (Alternatively put the whole lot in a food processor and pulse until you have breadcrumbs)
2. For the cake, sift the flour and baking powder into a bowl and set aside. Using a mixer or electric handheld whisk, cream the butter, sugar and vanilla until pale and fluffy. In a separate bowl, whisk together the milk and eggs. Gradually beat a little flour into the butter mixture, followed by a little of the milk and eggs, alternating until they’re all mixed in. Spoon the cake mixture into the prepared tin and level with the back of a spoon. (This can all be done in a food processor too.)
3. Peel, core and halve the apples, then slice thinly and toss in the lemon juice. Arrange on top of the cake mixture then sprinkle the chilled crumble over the top.
4. Bake for 1 hour or until a skewer inserted into the centre of the cake comes out clean. You can see when it is done as the cake rises in the middle and the apples begin to poke out. Transfer to a wire rack to cool. Great with vanilla ice-cream, whipped cream or clotted cream.

Monday, 8 February 2016

Spicy Sweet Potato & Black Bean Burgers with Avocado


When I was an art student I was. quite predictably some may say, a vegetarian for a few years. I loved cooking huge stir-fries and lentil dishes which were cheap and filling. We had a couple of the first vegetarian cafes in Brighton as well, but I have to admit, my favourite treat was a Spicy Bean Burger from Wimpy. In those days we even had an old fashioned eat-in Wimpy restaurant in Brighton, with waitress service, so you could make quite an outing of it.

I wanted to recreate my own, but I still have a glut of sweet potato so I decided to add them too. I used my adobo sauce from my Spicy Chipotle Maple Roast Sweet Potato and Brussel Sprout Grain Bowls in the mix and also made a Chipotle mayonnaise to go in my burger, balanced out with some cool avocado and I dare say, it was probably a damn sight better than the Wimpy one I so fondly remember.

Spicy Sweet Potato & Black Bean Burgers 2

Spicy Sweet Potato & Black Bean Burgers with Avocado Makes 4
500g / 2 sweet potatoes
350g drained black beans
1 red onion, finely diced
1 tbsp homemade Adobo sauce
1 small bunch fresh coriander, chopped
Sea salt and freshly ground black pepper
High quality vegetable oil or coconut oil
4 hamburger buns (optional)
2 avocados
2 tablespoons mayonnaise
2 tsp homemade Adobo sauce
Polenta flour
Optional other fillings – lettuce, tomato etc


Roast the sweet potatoes: Preheat the oven to 200C. Slice the sweet potatoes down the centre lengthwise. Place the sweet potatoes cut side up on a baking sheet. Drizzle with olive oil, salt and pepper and roast until they yield to a gentle squeeze, 30 to 40 minutes or longer. Once the sweet potatoes are cool enough to handle, remove the skin (it should pull off easily).

Meanwhile fry the onion in a little oil until translucent. Add a big tablespoon of Adobo sauce and fry for a minute more. Add the black beans and salt to taste, and mash with a potato masher. Add the chopped coriander and check seasoning. You can now chill the mix or carry straight on, it is up to you. Shape the mix into 4 patties. You can use polenta flour to help if you like.

Pan fry the burgers: (If you chilled the mix, turn on your oven to 180C) Heat 1 tablespoon oil in a large heavy bottomed frying pan over medium heat. When it’s hot, place the burgers in the pan, leaving enough room to flip them. Cook for 4-5 minutes until browned on the bottom and flip. If your mix is cold, put the frying pan in the oven and cook for 15 minutes or so until hot all the way through. I you did not chill the mix, then just turn the hob heat right down and cook gently for 10 minutes or so.
Meanwhile stir the mayonnaise in with the Adobo sauce and serve a big dollop on each burger.

(Toast the buns (optional): Place the buns on a baking sheet, cut sides up, and bake until lightly toasted, about 2 to 3 minutes)
Serve with your favourite fillings – avocado, lettuce, tomato etc

Roast Sweet Potatoes

Friday, 18 May 2012

Beta Than Cider


I recently realised that I was not doing nearly enough exercise. Since the kids have finally both started school, I don't even seem to walk as much I as used to.  No more endless trips to the park pushing buggies.  This lack of exercise is taking its toll - mainly on my hips and although there is absolutely no sign of any warm weather ahead at all, I just know that it is going to catch me out suddenly.  Winter will come to an end one day, the sun will come out and I will be very white, over-weight and un-shaven.  So I decided to take up Bikram Yoga.  Although frowned upon by purist yogis, this variation of yoga is done in a heated room which not only causes you to sweat profusely but you also have to work twice as hard, just to cope with the heat. The idea is it makes you more agile and less likely to suffer injury and the heat makes it more cardiovascular so you burn more calories. In reality, it is really almost unbearable but you feel fantastic when you manage to survive yet another class.

Unfortunately this new exercise regime also coincided with another new discovery. I developed an 
unhealthy obsession with cider.  Not just any cider by Henney's Frome Valley Cider which is so delicious that I just couldn't get enough of it.  It just seemed the perfect way to re-hydrate and re-tox in the evening after a hard couple of hours detoxing. Unfortunately, it turns out that cider is incredibly fattening and so it was having a very detrimental effect on my attempts to loose weight.  I now appeared to be developing a beer-belly as well, or a cider-belly to be more precise. So, very sadly, the cider had to go. But what could I possibly replace it with?

The only joyful experience about going to Bikram Yoga is that they have a lovely juice bar with deliciously,
tempting sounding concoctions.  However, having finished my relatively cheap 30 day introduction offer, the price rose rapidly, especially as they appear to expect you to go every day. However, at around £11.00 a class I really cannot afford to go more that twice a week and it has also forced me to economise on my new juice fix.  So I have turned to making my own.  After a few weeks of experimenting this is my favourite combination. 


First of all it must have beetroot, the ultimate super-food.  So long is it's list of benefits, that it is hard to believe that there is anything that beetroot can't do.  To counteract the sweetness I balance the flavour with celery and fennel and finally add a few carrots and a little apple. The overall list of health benefits of these vegetables on The World's Healthiest Foods website is so long that it would take you a week to read it but what is so amazing is that it tastes so good that you don't really even care.  The kids also love making juice so you can get them to do most of the work however there can be a bit of a battle as to who gets to drink most of the end results  but what better way to encourage your kids towards a healthy diet.


Beta than Cider
I really do recommend organic vegetables for juicing.  Since they are raw and I don't even bother peeling them I just don't want a whole lot of pesticides in my juice.  It is a really good way of using up an Organic Vegetable box which can work out cheaper than buying organic at the supermarket.  If you really want to go for it, add a handful of something green as well.  Spinach, beet-tops or Watercress are all especially good.
2 sticks Celery, washed
2 Carrot, washed and topped
2 Beetroot, topped tailed and well scrubbed
2 Apples
1 head of Fennel

Wash all the vegetables and cut the Beetroot, Apple and Fennel into wedges which will fit into the juicer.
Carrots and Celery are usually the perfect juicing size already to fit perfectly into the 
juicer shoot. Mix all the juices together well and drink as soon as possible. I like to keep the vegetables in the fridge to make your drink nice and cold.

If you would like some
more juice recipes I highly recommend Thirst by Nigel Slater.


Thursday, 26 April 2012

Eat Your Veg


As I may have mentioned, one of my many jobs is trying to inspire people how to use up a weekly organic veg box. I go to peoples houses and in two hours cook up a lunch for up to 10 people, from a medium veg box. None of the recipes are complicated, but I have to admit that when I get home from work, often the last thing I feel like doing is cooking. So I am going to share with you the ultimate easy, quick recipe for using up lots of veg, which also keeps kids and adults happy alike and it is none other than "a bake".

A "bake" really doesn't conjure up a good image for me - vegetable bake, tuna bake, cheesy bake - just the names fill me with repulsion. But there is no reason why a bake should not be a beautiful thing and happily it is always all baked in one pan, which saves on washing up.

I don't know about you, but when it comes to it my kids, aged 5 and 7, they are happiest eating nothing more complicated that some meat or fish, some potatoes and some vegetables. But it is so important to keep it varied, interesting and full of flavour. So this first recipe is just very simply a selection of all your families favourite vegetables, baked all together with a lovely piece of fresh wild salmon.. Choose a selection of seasonal vegetables which compliment rather than overpower the fish. This dish also makes a great alternative to a roast at the week-end especially when entertaining. If you want to impress, make a lovely Salsa Verde , some Salmoriglio or even a delicious Anchovy and Rosemary Sauce to drizzle over your fish.

The second recipe is similar but involves sausages instead of fish. I choose a selection of sausages. Some plain ones for the kids, some spicy ones for the adults. Chorizo style sausages work particularly well and add a smoky note. The sausages stand up to stronger flavoured vegetables - onions, shallots, swede, celeriac or parnips. This is a really good way of using up vegetables at the end of the week from your veg box. And, if you have got a lot of veg to use up, you can always leave out the fish or meat and just have the baked veg. It is just delicious on it's own.


Fillet of Wild Salmon and Vegetable Bake 
I only eat wild salmon, when in season, as I find farmed salmon is too fatty for me. There seems to be a good supply of sustainable Alaskan Wild Salmon available, very reasonable and full of flavour. ObviousIy I would prefer to shop more locally than Alaska so If you are worried about your carbon footprint then at least make sure that the vegetables are locally sourced. The selection of vegetables is up to you but the is my favourite. Beetroot or bitter leaves such as Radicchio or Trevise are also lovely with salmon.  One last tip about salmon: don't over cook it.  As soon as you see white liquid coming out of the salmon, that is albumin and it’s a protein, and is a sign that you salmon is done. Remove immediately from the oven and your fish should be still pink and juicy inside.

2 generous slices of wild salmon, with or without skin
2 bulbs fennel, trimmed of excess outer leaves, save fronds 

2 baby courgettes, cut in half
Large handful of cherry tomatoes
Couple of handfuls of New Potatoes, boiled in salted water until cooked
1 Bunch of Asparagus, woody stem snapped off
Extra Virgin olive oil
Salt and freshly ground pepper

Preheat the oven to 200 degrees C.
Cut the fennel into 4 or 6 pieces lengthways, depending on size.  Cut the potatoes in half or if very small leave whole. In a large baking dish toss all of the vegetables with 3-5 tablespoons of extra virgin olive oil. Make sure the tin is big enough.  If the vegetables are too crowded they will sweat instead of bake. Season well with salt and freshly ground black pepper. Try and make sure that the potatoes are facing down and that the fennel is also flat side down.  The more surface area that comes into contact with the bottom of the pan, the easier the vegetables will brown. Bake for 20 minutes, stirring once halfway through. Remove the pan from the oven and push the vegetables to one side. Season the salmon with salt and pepper and place it in empty space you made in the baking dish. Return the dish to the oven and bake
for another 10 minutes, based on thickness of the salmon. Scatter with the chopped fennel
fronds.

All sauce recipes are adapted from The River Cafe.

Salsa Verde
I vary this recipe according to what I am serving it with.  I prefer to go easy on the mint as it can end up tasting a bit toothpasty and instead I opt for basil, dill, chives or the fronds from the fennel tops.  Just get a good tasting balance.
1 large bunch Flat-leaf parsley leaves
1/2 bunch Mint leaves
Very good extra-virgin olive oil
3 Garlic cloves
100g Capers
50g Anchovy fillets
1 tablespoon Dijon mustard
2 tablespoons Red-wine vinegar

In a food processor chop the garlic, capers and anchovies. Add the mustard and vinegar, season and add some olive oil and purée until well amalgamated.  Add all the herbs and whiz and more olive oil to achieve desired consistency.


Salmoriglio
In a pestle and mortar, pound 4 level tablespoons fresh Thyme or Marjoram or a very good quality dried Oregano with 1 teaspoon sea salt until completely crushed. Add 2 tablespoons lemon juice. Pour 8 tablespoons of very good, peppery extra virgin olive oil slowly into the mixture. Add a little freshly ground black pepper. 


Anchovy and Rosemary Sauce
2 tbsp. fresh young rosemary leaves, very finely chopped
12 anchovy fillets
Juice of 1 lemon
150mls very good extra-virgin olive oil

Place rosemary leaves in a mortar and grind as finely as possible. Add anchovy fillets and grind to a paste. Add lemon juice, mix well, and then, stirring constantly, add oil, a few drops at a time. Transfer sauce to a small bowl.


Sausage Bake with Vegetables
You can use all sorts of vegetables in this dish. I like to use up whatever I have left in the fridge.

Some good quality sausages

1 Red Pepper, cut into largish chuncks
A handful or two of cherry tomatoes
1/2 a butternut squash, peeled and chopped into 2 cms chunks
2 parsnips, cut in 4 or 6 lengthways, depending on size
4 small shallots, pealed
1 or 2 Red onions cut into 8 wedges
A handful of New Potatoes, cooked in pleanty of salted water, cut in half
1 Bunch of Asparagus, woody stem snapped off
Extra Virgin olive oil
Salt and freshly ground pepper

A bunch of thyme

Preheat your oven to 200°C. Toss all the vegetables in plenty of olive oil, salt and pepper. Place in a large roasting tray with the sausages.  Make sure they are not overcrowded or they will sweat rather than bake.  Cook for about 30 minutes, stirring well half-way through.


Monday, 16 April 2012

KFC


I don't think I have ever had chicken at KFC. When I was a kid, there was a horific story in the papers, about how someone had got a bone stuck in their throat whilst eating Kentucky Fried Chicken and had been rushed to hospital.  After having had the bone removed it had been analised and the resulting verdict was that it was in fact a rat bone.  Whether this story was true or just an urban myth it made a lasting impression on me and I never stepped foot into a KFC for years.  Then in my 20's I bought a flat in Shepherd's Bush.  Near the end of my road was a branch of KFC.  The smell was so horrid that as a result I have managed now to get to my mid 40's, never having eaten a piece of fried chicken.  


But, as I mentioned a few weeks ago I have been watching a lot of Diners, Drive-in and Dives and Guy is forever raving about deep-fried chicken from South Carolina to Tennessee, not forgetting Kentucky.  Persistant shots of him biting into steaming hot, golden, crispy pieces of chicken have finally got to me and I had to try some. So I set about making the finger likin' best chicken that I could.  It would seem however, that everybodies recipe for their chicken seasoning is always "secret", though I am not sure why. Amazingly though, after a little research, I managed to find the "secret" recipe for Colonel Sander's very own chicken, with all 11 herbs and spices.  Nothing is sacred.  Apparently it was leaked some time ago.  Anyway,  I gave it a go and I have got to say - deep-fried chicken is really, really good.  Maybe not the thing to eat everyday but hot from the fryer with some freshly made coleslaw, I reckon I could really get into soul food.  Not surprisingly the kids loved it too.


KFC' Mix

I left out the MSG.  I was going to be really clever and try and add my own Umami in the form of some powdered Kombu but it was so delicious already, we had eaten all the chicken by the time I managed to buy some. Which just goes to show -  it doesn't need it.

1 teaspoon ground oregano
1 teaspoon chilli powder
1 teaspoon ground sage
1 teaspoon dried basil
1 teaspoon dried marjoram
1 teaspoon pepper
2 teaspoons salt
1 teaspoon paprika
1 teaspoon onion salt
1 teaspoon garlic powder
2 tablespoons Accent (MSG)


Deep-fried Chicken

1 free-range and or organic chicken with skin, cut into 8 or 10 pieces
Vegetable oil for deep frying
1 cup flour
1 batch of spice mix (above)
Pre heat oil in deep fryer to 340° to 375° F / 170 to 185° C.  Use a thermometer. Wash the chicken with cold water, both inside and outside, and drain it well. Mix together the flour and spice mix in a bag and shake well. Add the chicken pieces, one at a time, to coat them in the flour mixture. Lower the chicken into the fat one piece at a time, using tongs.  Start with the pieces with bone - the drum sticks and thigh pieces.  These will take about 20 to 30 minutes so add the breast pieces and small pieces such as the wings about half way through.  They will only take 10 to 15 minutes.
Make sure the temperature stays around 365°F/ 180°C and do not crowd the pot.
Fry the chicken pieces until they are golden brown, turning them occasionally. Transfer the done pieces to some kitchen paper. Remove any debris from the fat with a slotted spoon and keep frying the other chicken pieces. Serve hot or warm.


Coleslaw


1/2 Savoy cabbage, white part only, finely shredded
3 carrots, julienned on a Mandolin
1/2 Red onion, very thinly sliced
1/2 small Celeriac, julienned on a Mandolin
salt and freshly ground black pepper
1 tablespoon Dijon Mustard
Juice of one large lemon
Extra virgin olive oil

Mix the mustard with the lemon juice and some salt and pepper. Whisk well and slowly add olive oil, whisking all the time to amalgamate. You should have a creamy dressing. Use this to dress all the vegetables and check for seasoning to taste.


Wednesday, 15 February 2012

Waste not ........


It's half-term again and what with horrible cold weather, two fairly ill children (a lot of coughing, especially at night), we are completely broke as usual and the fact that I have no car (Hugh needs it for work), my prospects are looking fairly grim. We need something cheap, fun and entertaining to keep the kids happy. Cooking of course!  Our first venture was sausage rolls.  Primarily because it is one of the few things that my daughter, Amelie, happily eats.  However she is customarily fussy, even about them.  Usual complaints vary from too gristly (often valid); too peppery (her delicate pallet can be a little over-sensitive but even so, she may often have a case); there is some minuscule speck of green in them (down-right picky).  So as a treat I thought we would make them just the way she likes them.  Organic, out-door bread pork mince, not too fatty, no gristle, no seasoning at all, apart from her beloved salt, but not too much and absolutely no herbs. We used ready rolled good quality, all butter puff and in a matter of minutes we had a fabulous hot little snack for lunch.  

I had a little pastry left so we made some pig's ears or to use the more official name Palmiers for tea. Considering how quick and simple the whole procedure was, it was as always, remarkable quite how much clearing up there was to be done afterwards. Still, I felt after this impressive achievement of spending quality time with the kids that I was justified in sitting them in front of a DVD for the next two hours. Well, it was raining!  

Which after extensive clearing up still left me with about an hour spare.  I decided to knock up a couple of scotch eggs which I thought we could have with some salad for dinner.  First of all I seasoned up the pork mix with lots of freshly ground black pepper and a little mace and wrapped it around a couple of soft boiled eggs, which I then panned and deep-fried.  So, lunch, tea and dinner all sorted from half a pound of mince, a few eggs and a packet of puff pastry. And it is a good way of using up old bread.  Pretty economising, even for me!


Sausage Rolls
Add whatever extra flavouring you like to the pork; herbs such as thyme, sage or parsley, mace, nutmeg, lemon zest etc. 
I packet of good quality all butter puff pasty
2 eggs (one for filling and one for egg-wash)
150g outdoor bread pork mince
Couple of handfulls of freshly made breadcrumbs

Put the meat into a large bowl and mix well with your hands. Add a few handfuls of breadcumbs and one of the beaten eggs and seasoning well with black pepper and a little salt.  Pre-heat the oven to 180C. Roll out the pastry on a floured surface to about a thickness of about ½ cm, and cut into 3 lengthways. Divide the meat into little sausages, as long as your pastry, and roll each one up allowing an overlap.  Paint this with egg-wash before sealing. Slash the top with a knife and brush the outside with more egg-wash. Repeat with the rest of the pastry and meat.  Put the rolls on a baking tray, and bake for 25 minutes, or until golden. Cool on a rack, and serve warm.


Palmiers
You can flavour these with all sorts of different sugars such as cinnamon, vanilla, cardomon or nutmeg.  Alternatively you could make a savoury variety with parmesan cheese and a little cayenne and decorate with poppy seeds.
Sugar
Puff pastry

1 egg, beaten

Preheat oven to 180°C. Roll out the puff pastry to a rectangle. Paint lightly with egg-wash. Sprinkle with lots of sugar (and spices if using) over the dough. Roll up the left vertical side inward, stopping in the middle of the dough. Roll up the right side of the dough. The two rolls should be meeting at the middle and touching. Press the two sides together gently. Starting at one end, cut off pieces of the log, in slices about 1/2 inch in thickness. Lightly sprinkle sugar onto each side. Pinch and press the sides of the two rolls together to ensure that they don't unroll during baking. Place on large parchment lined baking sheets or non-stick tray. They will increase size a little, so leave plenty of room between each. Set the tray in the middle of the oven. Bake for about 10-15 minutes or until the sugar has caramelized. Turn if necessary. Allow them to cool on a rack for 10 minutes.


Soft-boiled Scotch Eggs
Add whatever extra flavouring you like to the pork; herbs such as thyme, sage or parsley, mace, nutmeg, lemon zest etc. 
2 large free-range eggs
150g outdoor bread pork
salt and freshly ground black pepper
Couple of handfuls plain flour, seasoned with salt and freshly ground black pepper
2 free-range egg, beaten (some for the mix and some to pane)
Few handfuls of breadcrumbs (some for the mix and some to pane)
Vegetable oil, for deep frying

Place the eggs, still in their shells, in a large pan of boiling water over a medium heat keep at a gentle rolling boil for exactly five minutes. Drain and cool the eggs immediately under cold running water, then peel. Mix the pork with a few handfuls of breadcrumbs, one of the beaten eggs and some salt and lots of freshly ground black pepper. Wrap the pork around each egg. Make sure the coating is smooth and completely covers each egg. You want it to be about 1/2 to 3/4 cms thick but It should not be thicker than 1cms or it will not cook. Dip each coated egg in the flour, then the remaining beaten egg, rolling to coat completely, then dip and roll into the breadcrumbs to completely cover.

Heat the oil in a deep heavy-bottomed pan and using a thermometer, heat until about 170 Degrees. Carefully place each scotch egg into the hot oil and deep-fry for at least 10 minutes, turning frequently, until golden and crisp and the sausage meat is completely cooked. (CAUTION: hot oil can be dangerous. Do not leave unattended.) Carefully remove from the oil with a slotted spoon and drain on kitchen paper. Serve cool. I like mine with HP sauce.  Class!